
7 Apple Themed Activities for Kids (Ages 3 - 8+) Sensory Bin Idea, Crafts & Free Printables
- Itala Hill
- Sep 19, 2025
- 7 min read

There’s something about apples that just begs to be turned into kids’ activities. Maybe it’s their bright colours, maybe it’s because they’re the one fruit we can usually get them to eat without protest. Either way, Autumn is the perfect time to dive into an apple theme with little ones!
Apple Pie Sensory Bin
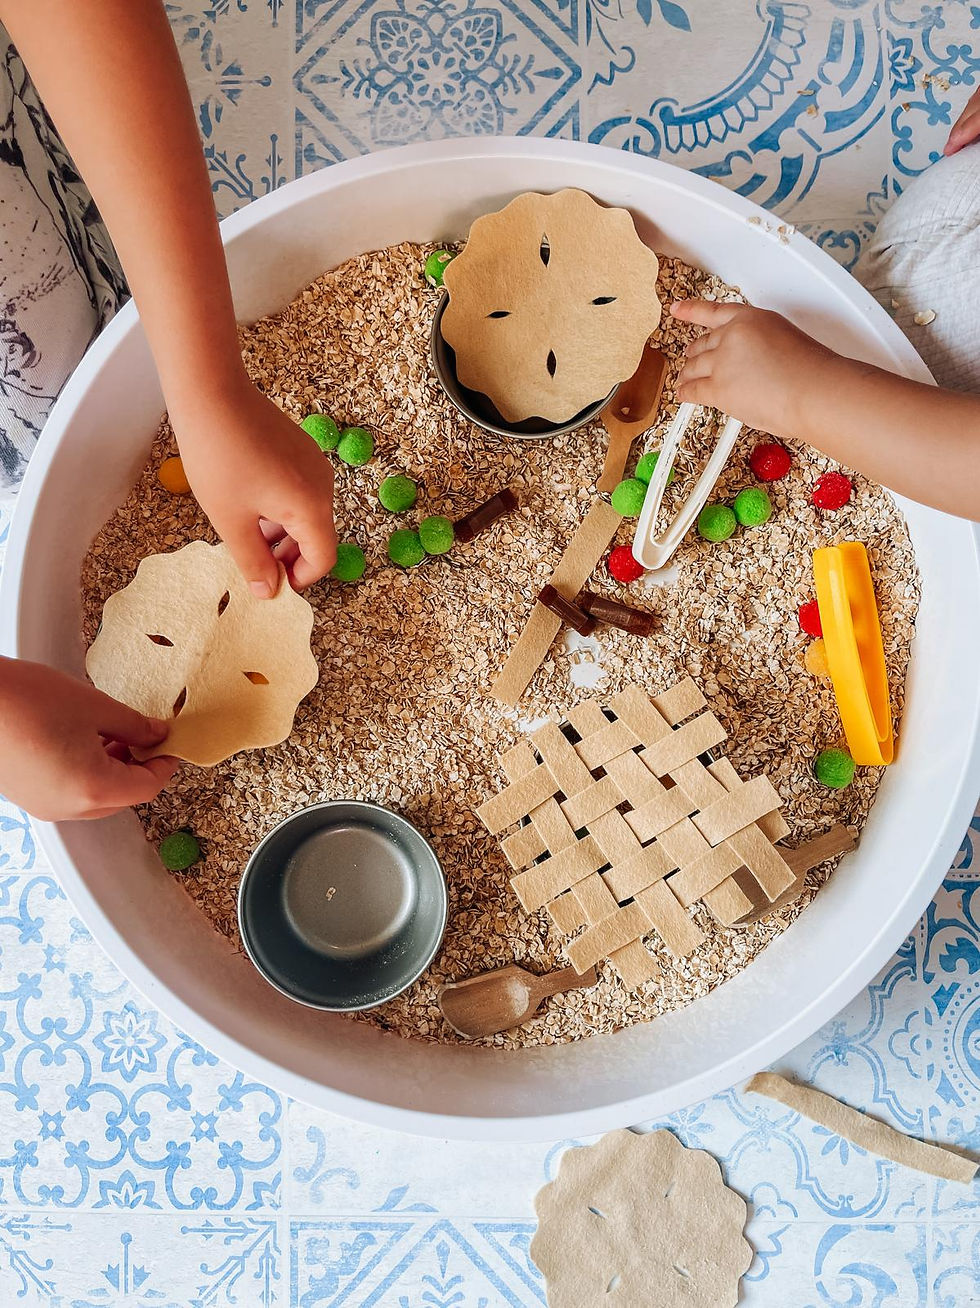
This Apple Pie Sensory Play setup combines pretend play, fine motor skills, and early math practice in one engaging tray. Perfect for toddlers, preschoolers, and early years, it’s a great way to celebrate apple season while encouraging creativity and learning through play.
I wrote a blog post all about it - You can find all the details and free printable for this [here].
Conserve Jar - Apple Stamping
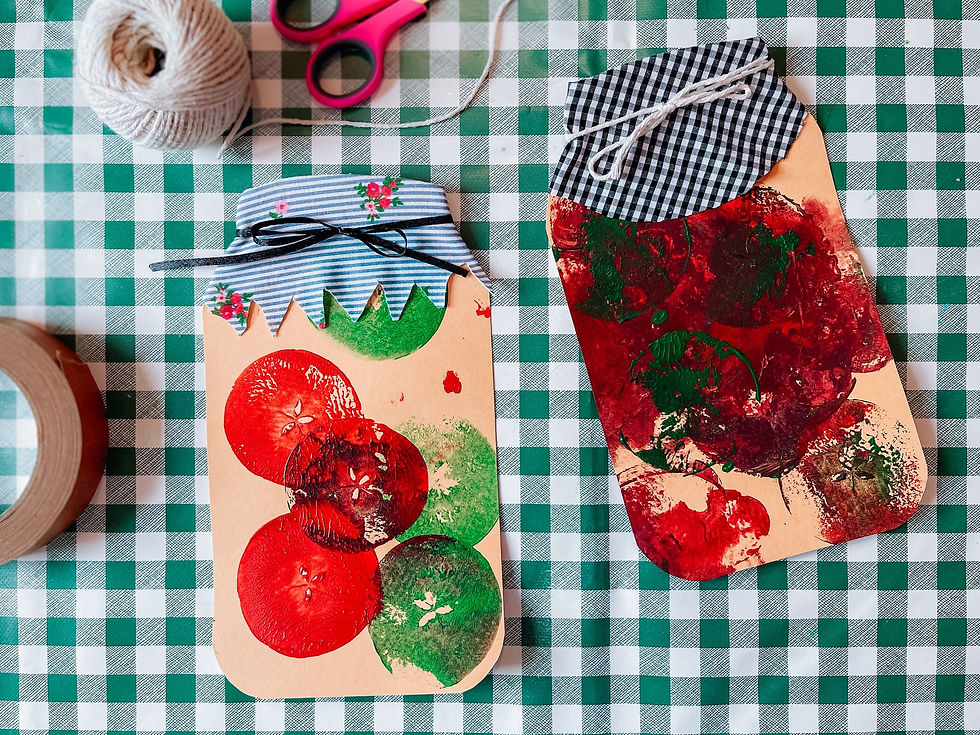
This apple stamping craft is a fun way to celebrate autumn, practice printing techniques, and create pretend jars of apple preserves for your classroom or play corner.
What You’ll Need:
Paper (thick paper works best)
Apples, cut in half
Washable paint (red, green, yellow, brown)
Paint trays or plates
Scissors
Tape or glue stick
Small pieces of fabric (for jar lids)
Ribbons or string


Instructions:
Cut your jar shape:
Don't panic, it's just a rectangle with curved edges and a bit sticking up on the top - it doesn't have to be perfect.
Stamping the apples:
Dip an apple half into paint and press it firmly onto the paper.
Repeat with different colours to fill the page with apple prints.
Allow the paint to dry completely. You can use a hairdryer to speed this up.
Making the jar lid:
Cut a square or circle of fabric large enough to cover the top of the paper jar.
Place it over the top, fold the excess over its back, and secure it with tape.
Add a ribbon or string tied into a bow to make it extra cute.
Now you have a beautiful display of pretend apple preserve jars, perfect for autumn decor or a classroom harvest project!
Apple Trees Colour Sorting

When we set up our cardboard apple tree, I thought the boys would simply “pick” the pompom apples and pop them into their baskets. But of course, children have a wonderful way of making things their own.
Luca (2) decided the higher apples needed some serious tools and raided the kitchen drawer for tongs — very resourceful little farmer! Meanwhile, Diego (5) raised the stakes by adding a few “snakes” (soft toys) hiding in the branches. Suddenly, apple picking became a brave rescue mission as well as a sorting challenge.
The simple idea of separating red and green apples turned into a whole adventure full of laughter, problem-solving, and imaginative play. Check it out [here].
Paper Plate Apple Threading with a Worm

Materials Needed
1 paper plate
Scissors
Paint (or markers/crayons - we used paint sticks)
Hole puncher (or scissors to make small holes)
Yarn or string
1 green pipe cleaner (to make the worm)
Googly eyes (optional, for the worm)
Glue or tape


Instructions
Cut the Apple Shape:
Cut a simple apple shape out of the paper plate (leave some of the ridged edge for texture).
Cut out a small leaf shape from the plate.
Add the Stem and Leaf:
Use tape to attach the leaf to the back of the plate.
Paint the Apple
Paint the apple red (or green/yellow if you want different varieties).
Paint or color the leaf green.
Let it dry fully if using paint.
Make Holes (Apple Bites)
Use a hole punch or carefully cut several small holes in the apple. These will be where the “worm” wiggles through.
Make the Worm
Fold the pipe cleaner in half and twist it, leaving the loop to tie the end of the yarn to (see picture above). Finish twisting it. This will make threading easier and form the worm’s body.
Add googly eyes to the pipe cleaner to bring your worm to life.
Threading Fun
Poke the “worm” through one of the holes and pull it in and out through different ones.
Kids can keep threading until the worm has munched its way through the whole apple.
✨ Learning Extension Ideas
For younger kids: focus on simple threading for fine motor skills.
For older kids: number the holes and encourage threading in sequence.
Add a story element: As you thread the worm through the apple, you can make up a little story! Say things like: “Here comes the worm… it is nibbling the apple… nom nom nom! It took a big bite and—peekaboo!—I can see it now! Oh, it’s going back inside the apple… nom nom nom… where will it pop out next?” This kind of play makes the activity extra fun and helps bring your apple and worm to life.
Handprint Apple Tree
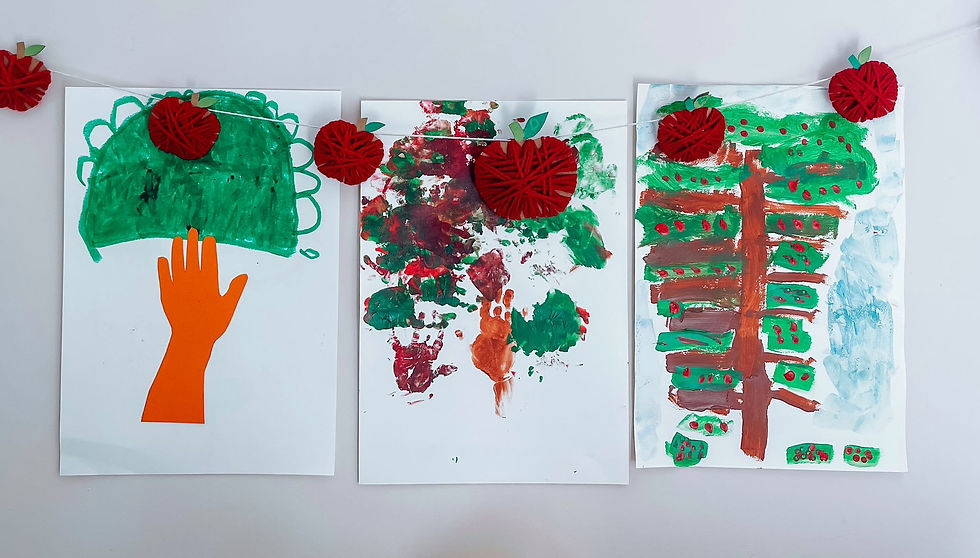
This is such a fun and hands-on craft for little ones, and it’s a great way to combine creativity with a bit of fine motor practice. There are two simple variations you can try, and they’re perfect for kids with different painting preferences. Adaptability is a must when it comes to craft activities - there is always another way so kids can explore and experiment in their own way!
Diego, my 5-year-old, isn’t a fan of squishy paint on his hands, so he chose the traced version, which turned out beautifully. Whereas Luca (2-year-old), couldn’t get enough of the messy version—he had a blast slapping paint across the paper! I was surprised at the end when Diego asked for an extra piece of paper to paint his own apple tree (yes, using wet, wet paint!).
Variation 1: Painted Handprint Tree

Materials:
White or light-colored paper
Brown paint (or marker/crayon)
Red, green, and optional yellow paint
Paintbrushes, cup of water, paper towels
Instructions:
Paint a brown tree trunk and a few branches on the paper. (Luca chose to use his handprint for this)
Dip your child’s hand in red or green paint and press above the branches to create the tree canopy. Repeat to fill out the tree (you can also use leftover apples from the apple stamping activity).
Use a finger or small brush to dot apples in red (and optional yellow or green).
Let it dry and add any extra details, like grass, flowers, or a sun.
Variation 2: Traced Hand & Arm Tree

Materials:
Brown paper
Green paper, paint or anything else green (for the leaves)
Pencil
Scissors
Glue
Red paper or pompoms for apples (optional)
Instructions:
Place your child’s hand and arm on the brown paper and trace around it. Cut out the shape to create the trunk and branches. If they’re old enough, let them do the cutting - it’s ok if it’s a bit - or a lot - off!)
Cut a cloud-like shape from green paper to represent the tree foliage, or let them be creative in their own way.
Glue the brown hand-and-arm trunk onto the green foliage.
Add red paper circles or pompoms as apples on the tree.
Yarn-Wrapped Apple Craft

Materials Needed:
Apple template (download button below)
Cardboard
Scissors
Red yarn or wool
Pencil
String (optional)


Instructions:
Prepare the apple shape:
I've created three sizes for you to choose from - pick whichever you prefer (we used the small and large sizes) and cut around it to create a traceable template.
Place your apple template on the cardboard and trace around it with a pencil.
Cut out the apple shape carefully. This will be your base for wrapping.
Start wrapping:
Secure the end of the yarn on the back of the cardboard with a small piece of tape, or by tying a small knot.
Begin wrapping the yarn around the cardboard apple, moving in different directions so the yarn covers the shape completely.
Fill it out:
Continue wrapping until the apple is completely covered and feels “cozy.” You can layer colors or create patterns if you like.
Finish off:
Once you’re happy with the coverage, tuck the yarn end under some of the wrapped strands on the back and tie a knot. Trim any excess yarn.
Optional decoration:
You can colour the leaf and the stem at the top.
These apples make lovely decorations or handmade gifts
Make a garland:
Using the same yarn or some string, tie the apples together to make a garland. I use my hand as a guide to space them out in similar distances.

Apple Pompoms

Who can resist a squishy little pompom? These apple pompoms are too adorable!
Materials
2 cardboard donut shapes (same size, cup + 2p coin method works well)
Red yarn (apple)
Scissors
Green pipe cleaner (stem)
Green felt (leaf, cut into a simple shape with a small hole in the base)


Instructions
Make the templates:
Cut 2 donut shapes from cardboard using a cup for the outside circle and a 2p coin for the centre hole.
Wrap the yarn:
Place the two donuts together.
Wrap red yarn all around until the centre hole is nearly filled — the fuller, the fluffier!
Cut the pompom:
Carefully snip all around the edge between the two cardboard layers.
Hold the yarn in place with your fingers.
Tie it off (with stem):
Take a length of red yarn and slide it between the two cardboard donuts.
Pull the yarn very tight, knotting it securely around both the pompom and the pipe cleaner.
Place the green pipe cleaner around the yarn in the centre and fold its end over, so it stays in place. This will become the stem.
Add the leaf
Slide your felt leaf (with a small hole at the base) onto the pipe cleaner, so it sits at the top of the apple.
Remove the cardboard
Gently pull away the donut templates to free the pompom.
Shape the apple
Fluff up the pompom and trim into a neat apple shape, leaving the stem and leaf poking out at the top.
Book Pairings
Pair your activities with a few apple-themed books:
Ten Apples Up on Top! by Dr. Seuss — fun counting story.
Apple Trouble! by Ragnhild Scamell — perfect autumn mischief.
How Do Apples Grow? by Betsy Maestro — simple science.
Snack Idea
Slice apples into rings, remove the core, and let kids add toppings: peanut butter, raisins, shredded coconut, or a sprinkle of cinnamon. A healthy and fun “apple donut” snack!
Wrapping Up
Apple-themed activities are a beautiful way to connect craft, science, literacy, and sensory play in one theme. Whether you’re stamping, experimenting, or squishing cinnamon playdough, children get to explore apples in ways that are playful and memorable.
✨ Remember, don't overwhelm yourself - choose a maximum of two activities to do on a day, and don't rush. Give space and time for the child to explore the materials, try it their own way, and use their imagination.
Which of these are you going to try first?
Until next time,
Itala


Comments